Common Admin Tasks
Updating the SAS Enterprise Session Monitor License
-
Using a web browser, navigate to http://localhost:18080/esm/ where 18080 is the port you configured SAS Enterprise Session Monitor Server on. If accessing from a machine other than the server, you must specify the hostname or IP address of the Server in place of
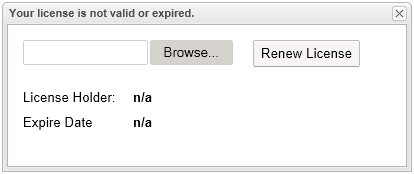
localhost. You should be presented with a screen requesting a license file
-
Click Browse to navigate and select your license file.
-
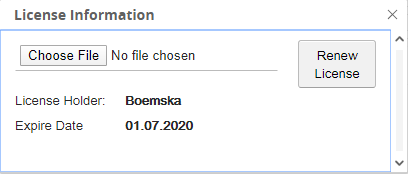
Click Upload, then click Renew License.
-
The License Holder and Expiry Date should be updated with the new license details.

-
Click Refresh. You should see the main SAS Enterprise Session Monitor Web Application screen.
Terminating sessions
Important Note
Sessions with an ESM type of SYS cannot be terminated from the user interface, regardless of the settings configured within the terminateSpec.yaml file.
The functionality to terminate sessions from the SAS Enterprise Session Monitor user interface requires the configuration of the terminateSpec.yaml file. This functionality is disabled by default.
To enable the session terminate capability remove the .template extension from the terminateSpec.yaml template file which is found in the bin folder of the agent.
The terminateSpec.yaml file uses regular expressions to match the name of the process that is requested to be killed and the owning user of the process that is to be killed. The configuration in the terminateSpec.yaml file extends the security capabilities that are found in the SAS Enterprise Session Monitor user interface.
| Property Name | Values | Notes |
|---|---|---|
processFilterRegex |
Regular expression pattern to match the process command line. | |
userFilterRegex |
Regular expression pattern to match the process | |
canBeTerminated |
Boolean parameter about whether the process that matches the above two rules can be terminated. |
An example terminate spec block for a SAS9 environment on Linux might look like the following:
terminateSpec:
  - processFilterRegex: .*SASFoundation\/9.4\/sas.*
    userFilterRegex: ''
    canBeTerminated: true
The above example allows any privileged user in SAS Enterprise Session Monitor to kill any SAS session, where that process is owned by any user, and where the installed path of SAS is something like /opt/sas/software/SASFoundation/9.4/.
SAS Enterprise Session Monitor Server Database Management
Database Backups
SAS Enterprise Session Monitor uses a PostgreSQL relational database as its data server. You can use standard PostgreSQL data backup procedures to back up and restore the database used by SAS Enterprise Session Monitor. For example, you could use the pgAdmin graphical user interface for manual backups, or you can integrate the pg_dump utility into scheduled scripts for automatic backups.
Note
SAS Enterprise Session Monitor ships with a modified version PostgresSQL 12.
To back up using the pg_dump utility:
-
Run pg_dump to export the SAS Enterprise Session Monitor database:
$ cd /path/to/esm-server/pgsql/bin $ ./pg_dump -h localhost -p 15432 -U esm -d esm > /backup/path/esm-data-postgres.sql -
Archive the exported database file per your organization's standards.
Database Restore
The text file containing the SQL that is created by pg_dump can be read in by the psql utility. To restore a backup of the SAS Enterprise Session Monitor Server database:
- Run psql to import the SAS Enterprise Session Monitor server database:
$ cd /path/to/esm-server/pgsql/bin
$ ./psql -h localhost -p 15432 -U esm -d esm < /backup/path/esm-data-postgres.sql
Extract Data
Using the SAS Enterprise Session Monitor Maintenance Utility you can extract data of various different types. When extracting data from a Server, the utility is intended to be run from the same machine where the Server is installed.
- Download the .zip file for your platform from here
- Modify line 2 of the vars.yml file for the location of your esm-server folder
- Modify line 3 of the vars.yml file removing the
#at the start of the line - Open a terminal or command prompt and navigate to the esm-maintenance folder that was created as part of step 1
- Run the following command to extract all of the data stored within your system updating the value of
to the location where you want the resulting CSV files to be created:
./esm-maintenance --extract-data --temp-dir <TMPDIR>
.\esm-maintenance.exe --extract-data --temp-dir <TMPDIR>
Additional Options
There are a number of other command line options that can be passed to the utility to control the amount, type, and content that is extracted from the Server. For a full list of options for the utility, please see the reference guide.
| Option | Description |
|---|---|
--obfuscate-users |
Obfuscate username data from the data extract files |
--obfuscate-hosts |
Obfuscate hostname data from the data extract |
--max-age |
The max age of the data to be retrieved in days. A value of 30 would mean data only data 30 days old or less being extracted |
--compress-data |
Specifies whether output datasets should be compressed. Default is True. You can just create CSV files, and not compress to a tar.gz file by specifying --compress-data=False |
--server-data-only |
Specifies whether to just export data at the server |
--these-sessions |
Specifies a comma separated list of session data to export |
--high-detail-output |
Specifies whether to only export very granular level data |
--high-detail-start |
Used with --high-detail-output |
--high-detail-end |
Used with --high-detail-output |
Automatic WORK and UTILLOC discovery
In a standard SAS Enterprise Session Monitor deployment we have a mechanism by which SAS temporary directories are associated with monitored processes and their measurements are presented as SASWORK (temp) or UTIL (util). These directories are supplied to the agent through the new event trigger file which is created automatically as a SAS session starts.
In certain configuration scenarios it is preferred to detach the directory scanning for the individual processes and instead measure those directories as sub-directories from a parent directory. This is achieved by creating and configuring a tempDirectories.yaml file in the bin directory of your SAS Enterprise Session Monitor agent.
| Property Name | Sub-property Name | Description | Example |
|---|---|---|---|
directories |
A YAML list of the directories in which SAS WORK or UTIL sub-directories will be created. The value(s) in this list should match the WORK and UTILLOC in your SAS configuration. |
- /sas/work |
|
settings |
warningDuration |
If the scanning of all of the directories takes more than the specified value (in milliseconds) a WARN message will be displayed to the SAS Enterprise Session Monitor agent log. | 2000 |
settings |
directoryPattern |
This is the regular expression that is used to pull out the three required values: dirType, dirPid, and hostname from the folder name. These values are required to associate the directory with the session. |
.*?SAS_(?<dirType>work|util)\w{4}(?<dirPid>\w{8})_(?<hostname>.*).boemskats.com |
settings |
directoryPidIsHex |
Specifies whether or not the directory PID (dirPid), pulled out of the folder by name by the directoryPattern, is a Hex encoded value. The default for SPRE and SAS9 is True. |
True |