Advanced Administration Tasks
Disabling Windows Short Names to enable SASWORK Monitoring
If SASWORK is configured to point to a volume with short names enabled, and you wish to monitor SASWORK with SAS Enterprise Session Monitor (recommended) you must change your SASWORK configuration to use a volume with short names disabled.
-
Determine the new location for SASWORK. This guide assumes a drive letter of E:
-
Query the short name status of drive E: by issuing the following command at a command prompt with elevated/Administrator privileges:
fsutil.exe 8dot3name query E:
C:\WINDOWS\system32>fsutil.exe 8dot3name query E:
The volume state is: 0 (8dot3 name creation is enabled).
The registry state is: 2 (Per volume setting - the default).
E:. If the status returns 8dot3 name creation is enabled on E:, issue the following command to disable it:
C:\WINDOWS\system32>fsutil 8dot3name set E: 1
Successfully disabled 8dot3name generation on E:
-
Now create a saswork directory (e.g
E:\saswork) -
Now change the SAS Server configuration to set SASWORK to point to this location. It is recommended to change this setting in the Application Server root sasv9_usermods.cfg file. For example:
add the following entry to this file:C:\SAS\Lev1\SASApp\sasv9_usermods.cfg-WORK "E:\saswork" -
Restart the SAS Object Spawners to pick up the new configuration
-
Start a new SAS Session and re-issue the saswork option query:
%put %sysfunc(getoption(work));If the change has taken effect, you should see output in the SAS log similar to the following:E:\saswork\_TD1592_WIN2008R2N1_
Running SAS Enterprise Session Monitor as a service on Linux
RHEL6.x comes with upstart as well as sysvinit, which allows us to control the agent on machine startup and if the agent stops.
RHEL7 comes with systemd replacing sysvinit and upstart from RHEL6. Systemd lets us configure control the Server on machine startup and if the Server stops.
Run the Agent as an upstart service on RHEL 6
To configure the agent to run as an upstart service, create a file in /etc/init called esm-agent.conf.
Update paths
Remember to change the references to ##ESMHOME## below to point to real install path (eg. /opt/esm/esm-agent).
#!upstart
description "SAS Enterprise Session Monitor agent"

# Set this to location of installed agent
env ESMHOME=##ESMHOME##

start on runlevel [2345]
stop on runlevel [!2345]

# Be nice and set some limits on open file handles
limit nofile 4096 4096

# But also make sure data gets collected when needed most
nice -15

# Return output about connecting to the SAS Enterprise Session Monitor server to the console
console output

# Restart automatically if agent stops but no more than 3x in the space of a minute
respawn
respawn limit 3 60

# Go
exec $ESMHOME/bin/esm-agent-nonforking.sh start
Following that:
run the initctl --verbose reload-configuration command to make upstart re-read the config
run start esm-agent to have upstart run the agent for you
Run the Server as a systemd service on RHEL7
To configure the Server as a systemd service, create a file in /etc/systemd/system called esm-server.service:
Update paths
Remember to change the references to ##ESMHOME## below to point to real install path (eg. /opt/esm/esm-agent) and to change the reference to ##ESMUSER## below to be the user with which you installed the Server component.
[Unit]
Description=ESM Server
After=network.target

[Service]
User=##ESMUSER##
ExecStart=##ESMHOME##/bin/esm-server.sh start
ExecStop=##ESMHOME##/bin/esm-server.sh stop
Type=forking
Restart=on-failure

[Install]
WantedBy=multi-user.target
Run the Agent as a systemd service on RHEL7
To configure the agent as a systemd service, create a file in /etc/systemd/system called esm-agent.service:
Update paths
Remember to change the reference to ##ESMHOME## below to point to real install path (eg. /opt/esm/esm-agent).
[Unit]
Description=ESM agent control
After=network.target

[Service]
ExecStart=##ESMHOME##/bin/esm-agent-nonforking.sh start
Restart=on-failure
Type=simple
TimeoutStartSec=10
TimeoutStopSec=5
RestartSec=2
ExecStop=##ESMHOME##/bin/esm-agent-nonforking.sh stop
SuccessExitStatus=143

[Install]
WantedBy=multi-user.target
After creating the file, you can run the following commands as root (or sudo):
- run
systemctl daemon-reloadcommand to make systemd re-read the config - run
systemctl start esm-agentto have upstart run the agent for you - run
systemctl enable esm-agentto have the agent start as a service on every subsequent boot - run
systemctl status esm-agentto see the output of the last start

Configuring LDAP authentication
Enabling LDAP authentication in SAS Enterprise Session Monitor allows developers to view the log files and manage their own sessions in a authenticated, audited way. When enabled, users will be able to authenticate using their normal Active Directory or LDAP account to view the log files or kill sessions where the username of the authenticated user matches the username of the owner of the session.
LDAP integration for SAS Enterprise Session Monitor can be done through the User Interface from the Privileged Users tab of the Admin Settings section of the application. In the top left of the tab, click the "Configure LDAP" button.
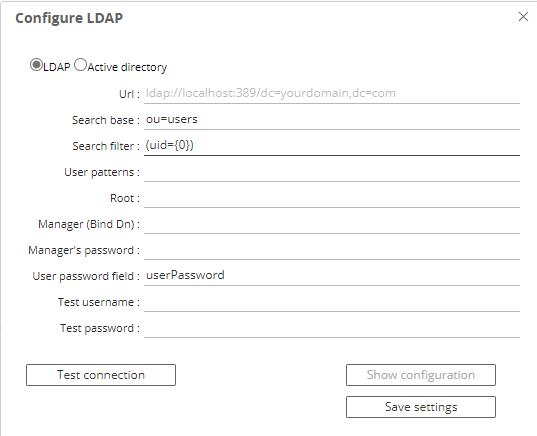
Alternatively, on your Enterprise Session Monitor Server machine, and depending on whether you are connecting to either Active Directory or another LDAP provider such as OpenLDAP, you can create a file called either ad.properties or ldap.properties in the following (relative) path of your SAS Enterprise Session Monitor server installation: esm-core/glassfish/domains/domain1/config. The user interface method creates this file in the background.
After the initial configuration either the user interface or a text editor to the configuration file can be used to make changes. The Enterprise Session Monitor Server needs to be restarted in order for changes to be picked up.
Active Directory configuration properties
An ad.properties file could should contain, at a minimum, the properties marked as required below:
| Name | Value | Notes |
|---|---|---|
ad.url |
ldap://<host>:<port>/ |
Required The URL of the Active Directory server that you are connecting to. |
ad.domain |
boemska.local |
Required The name of the domain that you are connecting to. |
ad.searchFilter |
Optional An AD search filter is used to define criteria to provide more efficient and effective searches (MS docs) |
LDAP configuration properties
An ldap.properties file could should contain, at a minimum, the properties marked as required below:
| Name | Value | Notes |
|---|---|---|
ldap.url |
ldap://<host>:<port> |
Required The URL of the LDAP server that you are connecting to. |
ldap.userSearchBase |
ou=users |
Required Example: |
ldap.userSearchFilter |
(uid={0}) |
Required The {0} is important as this represent the value that is to be searched for. |
ldap.root |
/dc=company,dc.com |
Optional. The root can be specified using the /dc=company,dc.com on the connection string URL. |
ldap.userDn |
CN=ESM Binder,cn=Users,dc=boemska,dc=local |
Optional. If the LDAP server that you are connecting to doesn't accept anonymous binds then you must specify an account with which to perform the initial LDAP server bind. |
ldap.password |
Optional. This is the valid password that corresponds to the user that is specified in ldap.userDn. |
Triggerfile formats
When communicating with the agent through the triggerfile mechanism, processes can output triggerfiles for consumption by the agent as either a space-separated array of quoted values, or in JSON format. The space-separated array depends on field order and is considered legacy, but remains around 40% faster to parse and therefore continues to be supported for high-stress environments with little available overhead.
The following are examples of each format.
Warning
For legacy reasons, the SAS Enterprise Session Monitor agent matches triggerfiles based on hostname and will disregard any files where the hostname element of the filename does not match the agent hostname exactly. This check may be removed in a future release.
new event triggerfile
File name: new_12345_thishostname (where 12345 is the PID of the process to be monitored and thishostname is the agent recognised hostname)
File content (json) an array of
{
    "owner": "thisUser",
    "sasUuid": "234801532270870",
    "hostname" : "mysashost",
    "queue": "defaultQueue",
    "jobName": "Lev1_SASAppTest",
    "workFolder": "/data/saswork/SAS_workC02600003039_thishostname",
    "utilFolder": "/data/sasutil/tempUtil_12345_thishostname",
    "logFiles": [
      {
        "logFile": "/data/logs/someWorkspaceLog.log",
        "logPattern": "someWorkspaceLog.*.log.*",
        "logDirectory": "/data/logs/"
      }
    ],
    "esmType": "WS"
}
tag event triggerfile
File name: tag_12345_thishostname_123 (where 12345 is the PID of the process to be monitored, thishostname is the agent recognised hostname and 123 is an identifier that ensures a unique filename for the triggerfile, often an autoincremented counter)
File content (json)
[{
   "text": "flagText",
   "tooltip": "tooltipText with more detail",
   "color": "#FAAD39"
}]
highlightStart event triggerfile
File name: highlightStart_12345_thishostname (where 12345 is the PID of the process to be monitored and thishostname is the agent recognised hostname)
File content (json)
{
   "uuid": "234801532270870"
}
highlightEnd event triggerfile
File name: highlightEnd_hostname_234801532270870 (where thishostname is the agent recognised hostname and 234801532270870 is the uuid
File content (json)
{
    "uuid":"234801532270870",
    "text":"myJobName.sas",
    "returnCode":0,
    "flow":"1670:thisUser:some_daily_flow:some_daily_subflow:myJobName"
}

want to see it in SAS Enterprise Session Monitor. This value can be hardcoded or you can use the results of a named capture group from the processFilterRegex using the special variable format ${var}. | Yes | normal |
event event triggefile
File name:
File content (json) an array of
{
    hostname: "testhost"
    podId: "pod-this-is-a-test-123h73"
    containerId: "1235"
    sessionId: "12354"
    esmUser: "testuser"
    timeStamp: "2022-07-01T14:44:44,000"
    eventType: "testtype"
    eventContents : {
        color: "#3AA5FC"
        message: "I"
        tooltip: "This is a test"
    }
}
Configuring SAS Enterprise Session Monitor for TLS
Transport Layer Security (TLS) is used to provide network security and privacy. In addition to providing encryption services, TLS uses trusted certificates to perform client and server authentication, and it uses message authentication codes to ensure data integrity.
Assumptions in this guide
Assumption 1 - This guide assumes the deployment of SAS Enterprise Session Monitor to a Linux system. The commands for Windows are the same but the commands will need to be updated to reflect the different path structures.
Assumption 2 - This guide assumes that all of the machines in your environment can talk to each other on the short hostname. If you are unable to ping the SAS Enterprise Session Monitor server from the agents without using the FQDN then you will either need to modify the hostname in the instructions or modify the /etc/hosts file on all of the machines in your environment.
Shutdown your environment before starting this guide
Before implementing the steps in this configuration guide it is important to stop all of the SAS Enterprise Session Monitor agents and the SAS Enterprise Session Monitor server in your environment.
Using your own certificate
Important
Using this method is only valid for ESM Server version 2022.4.3 and later.
Configure the Server
Note
This guide assumes that you received files fullchain.pem and privkey.pem from your certification provider. In addition, the Common Name (CN) from your certificate must match the URL that you will be using in your browser to access the application and match the hostname that Agents will use to connect to the Server.
-
Combine the
fullchain.pemandprivkey.pemfiles into a single file calledfullcert.pem:cat *.pem > /tmp/fullcert.pem -
Use OpenSSL to convert the file created in step 1 into PKCS12 format. You MUST set a password for the key store specified in the
-outoption below.openssl pkcs12 -export -out /tmp/fullcert.pkcs12 -in /tmp/fullcert.pem - Navigate to the esm-server directory of your SAS Enterprise Session Monitor server installation
- Import the
fullcert.pkcs12keystore into the Server'skeystore.jksfile using the below command.You will be prompted for the destination keystore password, enter:jre/bin/keytool -v -importkeystore -srckeystore /tmp/fullcert.pkcs12 -srcstorepass <PW-FROM-STEP-2> -destkeystore esm-core/glassfish/domains/domain1/config/keystore.jks -deststoretype JKSchangeit. - The above step import the certificate with an alias of "1". We can update this to something more meaningful:
keytool -keystore esm-core/glassfish/domains/domain1/config/keystore.jks -storepass changeit -changealias -alias 1 -destalias mycert - Edit
domain.xmllocated in esm-server/esm-core/glassfish/domains/domain1/config and on line 221 and specify cert-nickname to the value set in step 5. For example,cert-nickname="s1as"becomescert-nickname="mycert" - Copy files
fullchain.pemandprivkey.pemintoesm-server/esm-core/glassfish/domains/domain1/config/directory. - Add the following properties to the end of esm-server/esm-core/glassfish/domains/domain1/config/config.properties:
useSSL=true sslCertChainFile=fullchain.pem sslPrivateKeyFile=privkey.pem - Restart the esm-server
To verify the configuration, open the esm-server/esm-core/glassfish/domains/domain1/logs/server.log file. You should see a line similar to:
SSL configured using cert chain file '/opt/esm-server/esm-core/glassfish/domains/domain1/config/fullchain.pem' and private key file '/opt/esm-server/esm-core/glassfish/domains/domain1/config/privkey.pem' . SSL provider is 'JDK']]
Configure the Agent
- Update the value of the
ESMUSESSLoption in esm-agent/conf/esmconfig.sh totrueand make sureESMSECUREPORTpoints to the same port asESMPORTvariable, default is 18082.ESMUSESSL=true ESMSECUREPORT=18082 - Restart the SAS Enterprise Session Monitor agent
To verify the configuration, open the esm-agent/logs/esm-agent-<yourhostname>.log file. You should see a line similar to:
INFO ... SSL configured without trust cert file, using defaults.
INFO ... SSL provider is 'JDK'
ca.crt. If you want to use your file name, add this parameter to esm-agent/bin/config.properties:
tlsTrustCertFile=my_CA_ROOT.crt
Using OpenSSL to generate a self-signed certificate
Important
Using OpenSSL certificates is only valid for ESM Server version 2022.4.3.
Note
The value specified in step 2 of the below instructions must match the value that users will access in their browser. For example, if users will access the machine using the full qualified domain name of the server, this must be specified in step 2.
Configure the Server
- Navigate to the esm-server/esm-core/glassfish/domains/domain1/config directory of your SAS Enterprise Session Monitor server installation
- Edit line 5 of
opensslSelfSignedCerts.shfile and specify your server's hostname instead of localhostSERVER_CN=localhost - Execute
opensslSelfSignedCerts.shto generate the server certificate chain file (server.crt), server private key file(server.pem), and agent trust certificate file (ca.crt). - Add the following property to the end of
esm-server/esm-core/glassfish/domains/domain1/config/config.properties:useSSL=true - Restart the SAS Enterprise Session Monitor server
- Copy file
ca.crtto the esm-agent/bin folder for all agents.
To verify the configuration, open the esm-server/esm-core/glassfish/domains/domain1/logs/server.log file. You should see a line similar to:
SSL configured using cert chain file '/opt/esm-server/esm-core/glassfish/domains/domain1/config/server.crt' and private key file '/opt/esm-server/esm-core/glassfish/domains/domain1/config/server.pem' . SSL provider is 'JDK']]
Configure the Agent
- Ensure that the
ca.crtfrom step 6 of the server configuration guide exists in the bin folder of the Agent installation. - Update the value of the
ESMUSESSLoption in esm-agent/conf/esmconfig.sh totrueESMUSESSL=true - Restart the SAS Enterprise Session Monitor agent
To verify the configuration, open the esm-agent/logs/esm-agent-<yourhostname>.log file. You should see a line similar to:
INFO ... SSL configured using trust cert file 'ca.crt'
INFO ... SSL provider is 'JDK'
Using Java Keytool to generate a self-signed certificate
Configure the Server
-
Navigate to the root of your SAS Enterprise Session Monitor server installation directory
-
Generate a private key, a certificate signing request, and a certificate, and add the certificate to the key chain:
./jre/bin/keytool -genkey -keysize 2048 -alias mymachine -validity 36500 -keyalg RSA -dname "CN=localhost,O=MyOrg,L=London,S=UK,C=UK" -keypass changeit -storepass changeit -keystore esm-core/glassfish/domains/domain1/config/identity.jks
- Export the generated certificate for deployment to the SAS Enterprise Session Monitor agents:
./jre/bin/keytool -export -alias mymachine -file mymachine.cer -keypass changeit -storepass changeit -keystore esm-core/glassfish/domains/domain1/config/identity.jks
-
Modify the
domain.xmlfile within following location from the root of your SAS Enterprise Session Monitor server installation directoryesm-core/glassfish/domains/domain1/config/: -
Replace lines
221and384with the following updating thecert-nicknamevalue with thealiasof the certificate that was exported in step 3 above:
<ssl classname="com.sun.enterprise.security.ssl.GlassfishSSLImpl" cert-nickname="mymachine">\</ssl>
- Add the following property to the end of
esm-core/glassfish/domains/domain1/config/config.properties:useSSL=true
Configure the Agent
-
Navigate to the root of your SAS Enterprise Session Monitor agent installation directory
-
In the root of your SAS Enterprise Session Monitor agent installation, create a
certsfolder. - Copy the
mymachine.cerfile created in step 3 above into thecertsfolder created in the step above - Import the certificate into the agent's trusted certificate keystore
./jre/bin/keytool -import -trustcacerts -noprompt -file certs/mymachine.cer -alias mymachine -storepass changeit -keystore jre/lib/security/cacerts - Verify that the certificate was successfully added to the keystore
./jre/bin/keytool -list -v -storepass changeit -keystore jre/lib/security/cacerts - Update the following configuration option in
conf/esmconfig.shESMUSESSL=true - Restart the SAS Enterprise Session Monitor agent
Additional TLS Tasks
Verify certificate is in the keystore
On the SAS Enterprise Session Monitor server:
./jre/bin/keytool -list -v -storepass changeit -keystore esm-core/glassfish/domains/domain1/config/keystore.jks
Delete certificate from the keychain
On the SAS Enterprise Session Monitor server machine:
jre/bin/keytool -delete -alias localhost -storepass changeit -keystore esm-core/glassfish/domains/domain1/config/keystore.jks
Permitted Log File Locations
By default, Enterprise Session Monitor will allow any process to register any file as a log file. In certain deployment scenarios this could present a security risk by allowing users to gain read access to files for which they are typically unauthorized. To prevent users from arbitrarily adding files as the log files for a process, Enterprise Session Monitor administrators may specify one or more regular expressions within a file called permittedLogFileLocations.yaml.
When the permittedLogFileLocatons.yaml file exists in the bin folder of the ESM agent, only files that match one of the specified regular expressions maybe added.
Sample file format:
permittedLocations:
  - regex1
  - regex2
By default this file does not exists and any location/file may be added as a log file to a process.
SAS Enterprise Session Monitor Server Configuration Reference
With every server deployment there is a file called config.properties which can be found in the esm-core/glassfish/domains/domain1/config of the Server installation directory. This configuration file is used to control the behaviour of the SAS Enterprise Session Monitor Server. A full list of the Server configuration properties, a description of the property, and the default value, can be found below.
| Property | Description | Default Value |
|---|---|---|
transport |
Available transport options are: websocket, sse, jsonp, streaming, long-polling, session | websocket |
fallbackTransport |
Available fallback transport options are: websocket, sse, jsonp, streaming, long-polling, session | streaming |
agentsPort |
The gRPC port that the server will open and listen on for Agent connections | 18082 |
locale |
Overrides the client side detection for locale and uses the value specified in the option. | NULL |
useSSL |
Enforces the use of Transport Layer Security for all Agent and Server communications. | False |
enabledAutomaticUserRegistration |
When enabled, if a user successfully authenticates with either LDAP or Active Directory password, their user will be added to the User Registry and will count towards the number of active users. | False |
defaultPartitionMinThreshold |
If any _default partition of the database is greater than 0 but below the configured size (in bytes) the table will be considered empty and internal error and warning events will not be generated. |
8192 |
requireLogin |
By default, the application will require all users of the application to immediately login. For Enterprise Session Monitor customers who have a Core based license, this functionality can be disabled. | True |
SAS Enterprise Session Monitor Agent Configuration Reference
With every agent deployment there is a file called config.properties which can be found in the bin folder of the agent installation. This configuration file is used to control the behaviour of the SAS Enterprise Session Monitor agent. A full list of the agent configuration properties, a description of the property, and the default value, can be found below:
| Property | Description | Default value |
|---|---|---|
monitorAllSessions |
Used to enable active process discovery | False |
monitoringInterval |
Used in conjunction with monitorAllSessions to specify the interval, in seconds, at which the host's process table is scanned |
10 |
threadsIndexer |
The number of threads dedicated to periodic node-level directory sizing | 5 |
processMonitorThreads |
The number of threads dedicated to measuring process performance | 1 |
processIOMOnitorThreads |
The number of threads dedicated to measuring per-process temp directories | 1 |
threadsCrawler |
unknown | 5 |
maxiothroughput |
The ceiling limit for IO reads and writes per-second in bytes. This is a work around for a SIGAR underflow issue. | 263-1 |
maxBufferSize |
The number of process measurements kept in the local agent cache if the server is uncontactable. | 250000 |
maxSessionsCount |
The maximum number of processes that can be tracked by the agent | 5000 |
startTimeVarianceTolerance |
This is a tolerance limit in milliseconds for hardware clock drift when identifying unique processes by pid and start time. | 2000 |
maxEventFileSize |
The maximum size of a file, in bytes, of a file that will be read from the ESMEVENTS folder. If a file exceeds this size, the agent will delete the file without reading it and log an error in the agent log file. | 10485760 |
dontReportAgent |
Disable sending of data from this agent to the configured server | False |
regexTimeout |
The number of milliseconds before a regex lookup is considered catastrophic (in L notation) | 100L |
ignoreExistingSessionsOnRestart |
Disable the retrieval of existing session list from the server | False |
containerIdDisable |
Disable cgroup-based identification of the process container | True |
disableProcessIOCollection |
Disable per-process IO metrics collection | False |
disableProcessMemoryCollection |
Disable per-process memory metrics collection | False |
logEventsRateLimit |
Limit the number of events that are generated per-log for each iteration of the agent metric collection cycle. Events exceeding this number are skipped. | 100 |
containerIdRegex |
The regular expression that is used to extract the container ID from cgroups. | \\d+:\\w+:(\\/docker\\/|\\/kubepods\\/.*\\/)(.*) |
containerIdRegexGroup |
The number of the capture group, defined in containerIdRegex that contains the actual container ID to be passed to the server when registering a pod. |
2 |
logDiscoveryDisable |
Disable discovery of log files that are defined in the processLogfilePattern property of the filterSpec.yaml file |
False |
disableCopyTruncate |
By default, if a log file reduces in size from when it was last read, the agent assumes that the log has been rotated, and will start reading the log file from the beginning. Setting this value to True will override this functionality and the log will wait until the file is bigger than the last read size. |
False |
useCumulativeIOCounters |
Use alternate SIGAR counters for measuring disk IO. You should set this to True by default on Windows. |
False |
disableProcessStateCollection |
Do not collect process state information (# of threads, status, etc.). This data is not exposed on some operating systems including Solaris and generates an error. | False |
disableProcessFDCollection |
Do not collect process file descriptor information (# of threads, status, etc.). This data is not exposed on some operating systems including Solaris and generates an error. | False |
disableUsingPsForProcessOwner |
The agent primarily uses a SIGAR function to get the process owner information. As a fallback, the process table is looked up directly. Setting this value to true, disables the fallback method. If SIGAR is unable to find the username and the fallback has been disabled, the username for a process may be blank. | False |
totalIOThroughputOnly |
Do not try and collect separated read and write IO information. This data is not exposed on some operating systems including AIX and can generate an error if not set to True. |
False |
autodiscoveredTempRemoval |
When a process' temporary directories (SAS work & UTIL) are automatically discovered, this sets the default behavior for what should happen to those directories when the associated PID is terminated through the SAS Enterprise Session Monitor user interface. | True |
serverMode |
When an agent is in serverMode a hard coded, internal filterSpec.yaml file is used to only discover SAS Enterprise Session Monitor server and SAS Enterprise Session Monitor database processes. When an agent is in server mode, the number of cores of the running server are not counted for licensing purposes. |
False |
logThreads |
The agent uses multiple threads to scan log files. You can control the number of threads that the agent uses to read log files. | 4 |
-
There are a number of keywords that have a special meaning within SAS Enterprise Session Monitor including: Batch, STP, WS, CS, GRID, Foundation, SPRE, viya, CMP. You should avoid using these for customer processes unless you are aware of the implications. Please contact technical support for more information: support@sas.com. ↩